Wednesday, August 21, 2013

Peach Preserves 

This was so worth the hour I spent making these ! So simple and so delicious. Buy them up cheap and save them to use when they would be out of season and not nearly as fresh!

You will need....
Lg canning pot
Lg pot for peaches
Mason jars and new lids
6 L peaches
1 1/2c sugar
Cinnamon sticks
Water, water, water


First , make sure you have prepared your jars. You can wash them in hot water and leave them in the hot water in your sink. Or you use your dishwasher and keep them in there until you are ready to fill them. You just have to keep them warm so they don't break on you when you put them into boiling water. Don't forget to wash your lids.

Make sure your big canning pot is full with the lid on working up to a boil while you do all these things.

Now get another pot and bring it to a boil. When it's at a rolling boil you want to gently drop in your peaches for about 60  seconds.


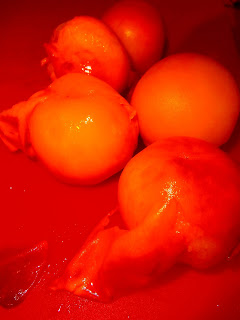
Remove them and put them right away into cold water to stop the cooking. Like magic before your eyes you should be able to just rub off the peel.
(You can do this in batches and you can return the peach to the boiling water if the peel is not ready)


Now remove your pit. I just run my knife along it from one side to the next and then wiggle the knife a little. Twist and it should come apart.

At this point I dump my peach water and put about 10cups of fresh water in there and whisk in about 1 1/2c sugar. You can put more in if you want a thicker/sweeter syrup. I wanted mine to taste more natural.

Now pack your peaches into the jars and slide a cinnamon stick in with it. Leave room at the top. Now fill with sugar water mixture , tapping out any air bubbles. Secure the lid.
Repeat, when your jars are ready put them into your boiling water and make sure the water is covering the jars by about an inch or two. Cook for about 20-25minutes.

Peach Preserves  


Remove and let cool. When they are cool you should be able to press down the lid and it will make a popping sound and it will stay down. If it doesn't , you can put it in your fridge and have it for dessert tonight or you can just return it to the boiling water for another few minutes and try again.

It's a good idea to label your jars when they cool and you are ready to store them in your cool, dry place (ie, NOT beside your furnace or garden shed....). They should last about a year !

Eat them as they are. Over ice cream. In oatmeal. Under a crumble or in a pie.... sky's the limit!

Tuesday, August 20, 2013

The Domestic Arts 

I have been wanting to do so many things for  the longest time. I just couldn't seem to juggle all my interests with so many young children and pregnancies happening over the last 12 years. This year I was not not nursing or pregnant and there was no stroller ! When you've had 7 pregnancies in 10 years this is a BIG DEAL !

So between that and Pinterest overload I've gotten really excited about getting back into what I call "the domestic arts". All those extras that warm your home. When my children grow up I want the sound of a sewing machine to remind them of me. I want the smell of warm cookies to feel like home.  I want them to remember eating  warm tomatoes straight from the vine. I want them to experience sunshine on their clothes. I want the sight of a mason jar to stir up countless reminders of the love that filled them.

When they get married and start their families I want them to value these things in their wives. I want them to see purpose in the little things their wives do because they know what it meant to their growing up. I want them to appreciate the creative touch a woman who pursues the art of making a home can bring.

Ladies, do you realize when you apply your efforts into these tasks how empowered you are? When you do a good job, I mean really put thought and effort into your career at home, you have the power to change your children's world view. Do you really think they will see women as less valuable because they are home or because we complain about being home ? When you choose to make a career of homemaking be joyful , be progressive in your talents and be purposeful ! We were never made to be less by being home, we've done that on our own by teaching our children that we are unhappy, feel undervalued , resent the loss of (insert personal issue here). 

Homemakers don't have to fit a mold. Just because one person loves to bake and you love photography doesn't mean one of you is better. Every area of God given talent allows you to leave your fingerprint on your home. Use your passions and be blessed by the opportunity to be home , if you are so lucky.

When I look back at my memories of my mother now I remember her being very resourceful. Honestly, she could bake an apple pie by using green tomatoes. She cooked from scratch - every birthday cake. She sewed our Barbies clothes. Clipped down old cards with her "fancy" scissors to make gift tags.

I'll tell you something, she really doesn't like cooking and sewing (I don't think ) but one of her talents is being resourceful. She took pleasure in being able to source a way to meet the needs with the little there was. My parents were missionaries. She kept chickens for crying out loud ! Actually that one makes me laugh out loud. She made our house a home and provided us with cherished memories. She set a great example of how to manage a home.

Be encouraged ! If you are home, even for a season, make the days count. Raise your value but enjoy what you do and don't be tempted to compare yourself to another wife/mother.

You will be getting a good helping of blogs from me in the next bit. Recipes and such things that I am working on. I hope you will find encouragement in them.

Sunday, August 18, 2013

Easy T-Shirts Without a Pattern

Easy T-Shirts Without a Pattern 


I'm going to start off this entry by giving you a gentle warning. If you are an avid , skilled seamstress, this blog is not for you ! This is a humble blog for ladies in the process of making the title of Homemaker their profession . Perhaps you don't have much time in this season of life or many resources. But you want to find new ways to improve your home, save money or learn a new hobby.  I'm glad you are interested in following my journey !


I've really come to enjoy putting together a number of projects. You are about to participate in my first attempt at making t-shirts for me and the family.
I bought myself 2 meters of a stretchy cotton fabric, on sale for $2/meter ! What a steal ! One walk through your fabric store and you will quickly see that projects can either save you money or cost you some very serious money !

Ready ? Here we go-

Find your favourite t-shirt.
Fold your fabric down the middle so you have a long piece doubled over.
Fold your shirt in half and put the folded side along the fold of the new fabric.
Now you can either trace around it or pin it to the fabric and cut right away. If you are thinking you will be perfect this time around and want a pattern that you can reuse you can draw out the shape onto craft paper.

When you trace your shirt to cut out, be sure to leave a seam allowance. This is usually about 5/8of an inch of extra fabric that you will need in order to stitch.

You now have the BACK piece of your shirt.
To make the front I place my cut out piece over the fabric so that I know my pieces will be symmetrical when I sew them together.

The trick now is that you have to make the neck line. Notice how it will be lower than your back piece.
I've done a V neck today. I found the middle point and made sure that my lines were straight and even.


With right sides together ( usually the patterned side, I'm sorry my material doesn't have one), find your shoulder seams and stitch the front and back pieces together. Do this for both sides. Use your favourite T-shirt as your guide to locate the shoulders !

Now take a long strip of your leftover fabric  and cut it into a strip that's about 2-3 inches wide. This is going to be the collar.
Whenever you sew make sure you set up your ironing board ! Seriously, it is worth the time to always press your fabric. You will achieve a much cleaner finish and your fabric will be easier to use as well.
Fold your strip together lengthwise, wrong sides together. And press it.  


 Now the fun part. Do this slowly, carefully and right ! 
Turn your shirt back to right sides out.
You are going to measure around how long a strip you need for the collar. And, you are going to fold over the strip into the "V" at the end. Pay attention to where the folded edge is- that's what I got caught up on ! 
Once you have stitched the tip of your "V" in the strip line it up with the shirt. I cut a  small slit on my shirt for extra flexibility where you see the arrow.
Tack it into place. First right in the center and then a couple of pins on either side.
stitch that into place and then work the collar into place and stitch that.
Admire, press !  

It's a good idea when you do any of your stitching , that you go around again with a zig-zag stitch if you aren't using a serger.

You are almost done !
Stitch up the sides, with right sides together and hem the bottom and the sleeves !
Voila !


Now off to make some for the family.  Now that I've done a practice shirt I will be able to add all sorts of wonderful to it !

Let me know how yours turn out ! Share your pictures on my facebook page at Growing by Grace.